
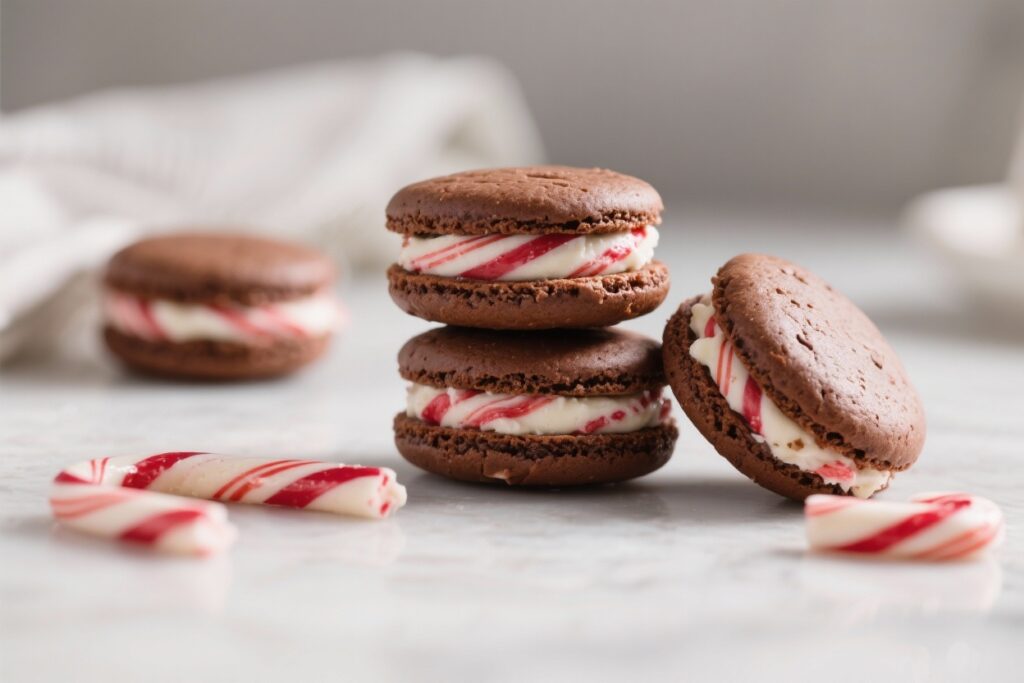
You want dessert that smashes cravings without smashing your macros? This is the one. These Keto peppermint chocolate whoopie pies are soft, fudgy, and minty-fresh with a creamy filling that actually feels like dessert—because it is.
But here’s the twist: they’re low-carb, sugar-free, and won’t put you into a blood sugar spiral. Make a batch, flex on your goals, and maybe don’t tell anyone they’re keto until after they ask for seconds.
The Secret Behind This Recipe

The magic is in the texture. Whoopie pies are supposed to be plush and cake-like, not crumbly.
We achieve that by blending almond flour with a little coconut flour for structure, and using Dutch-process cocoa for deep chocolate flavor. A spoonful of sour cream keeps the “cakes” tender, while xanthan gum mimics gluten’s bounce without the carbs. For the filling, we combine cream cheese and butter for stability and richness.
A touch of peppermint extract wakes up the chocolate like a cold plunge for your taste buds. And yes, we sweeten smart—using powdered erythritol or allulose so you get smooth sweetness without grit or aftertaste.
Ingredients
- Dry ingredients (whoopie pies):
- 1 1/2 cups fine almond flour
- 2 tablespoons coconut flour
- 1/3 cup Dutch-process cocoa powder (or high-quality unsweetened cocoa)
- 2/3 cup granulated erythritol or allulose (or a blend)
- 1 teaspoon baking powder
- 1/4 teaspoon baking soda
- 1/4 teaspoon fine sea salt
- 1/2 teaspoon xanthan gum (optional but recommended)
- Wet ingredients (whoopie pies):
- 2 large eggs, room temperature
- 1/3 cup sour cream (or full-fat Greek yogurt)
- 1/3 cup unsweetened almond milk
- 1/3 cup melted butter or avocado oil
- 1 teaspoon vanilla extract
- 1/2 teaspoon peppermint extract
- Peppermint cream filling:
- 4 ounces cream cheese, softened
- 4 tablespoons unsalted butter, softened
- 1 1/4 cups powdered erythritol or allulose (sifted)
- 1/2 teaspoon peppermint extract (adjust to taste)
- 1/2 teaspoon vanilla extract
- 1–2 tablespoons heavy cream (as needed for texture)
- Pinch of salt
- Optional: 1–2 drops natural green food coloring or crushed sugar-free peppermint candies for garnish
Cooking Instructions

- Preheat and prep: Heat oven to 350°F (175°C). Line two baking sheets with parchment paper.
This prevents sticking and keeps the edges tidy.
- Whisk dry ingredients: In a large bowl, whisk almond flour, coconut flour, cocoa, sweetener, baking powder, baking soda, salt, and xanthan gum until evenly combined.
- Mix wet ingredients: In a separate bowl, whisk eggs, sour cream, almond milk, melted butter (slightly cooled), vanilla, and peppermint extract until smooth.
- Combine into a thick batter: Pour wet into dry and fold until just combined. The mixture should be thick but scoopable—like soft cookie dough. If too thick, add 1–2 teaspoons almond milk.
- Scoop and shape: Use a tablespoon or small cookie scoop to portion 24 mounds (about 1.5 inches wide).
Lightly smooth tops with damp fingers for a classic whoopie shape.
- Bake: Bake 9–11 minutes until set and slightly springy. Do not overbake—dry equals sad. Let cool on pans 5 minutes, then transfer to a rack to cool completely.
- Make the filling: Beat cream cheese and butter until fluffy, 1–2 minutes.
Add powdered sweetener, peppermint, vanilla, and a pinch of salt. Beat again, adding heavy cream 1 tablespoon at a time until thick, spreadable, and silky.
- Adjust flavor: Taste and tweak peppermint very carefully—peppermint goes from “refreshing” to “toothpaste” fast. Add a drop at a time if needed.
- Assemble: Pair cookies by size.
Pipe or spread 1–2 tablespoons of filling on the flat side of one cookie, top with its match, and press gently to spread.
- Optional garnish: Roll edges in crushed sugar-free peppermint candies or add a drizzle of melted sugar-free chocolate. Because extra flair never hurt.
- Chill: Refrigerate 20–30 minutes to set the filling before serving. The texture improves as they rest, IMO.
Storage Instructions
- Refrigerator: Store in an airtight container for up to 5 days.
Separate layers with parchment to prevent sticking.
- Freezer: Freeze assembled pies on a sheet pan until firm, then transfer to a zip bag for up to 2 months. Thaw in the fridge 2–3 hours before serving.
- Make-ahead: Bake the cakes and freeze them plain. Whip the filling fresh for best texture.

Why This is Good for You
- Low in net carbs: Almond and coconut flours keep carbs minimal, helping you stay in ketosis while still enjoying dessert.
- Blood sugar friendly: Using erythritol or allulose avoids the glucose spike-and-crash loop.
Your energy stays stable.
- Healthy fats: Butter, cream cheese, and almond flour deliver satiating fats so one whoopie pie actually satisfies.
- Protein support: Almond flour and eggs add a little protein, which helps with cravings and fullness.
- Mint + cocoa synergy: Peppermint can feel refreshing and may reduce appetite perception; cocoa brings antioxidants. Do you need an excuse? Didn’t think so.
Common Mistakes to Avoid
- Overbaking the cakes: Pull them when they’re just set.
Dry whoopie pies are basically regret sandwiches.
- Skipping xanthan gum: It’s optional, but it improves structure and chew. Without it, they can be too delicate.
- Using granular sweetener in the filling: It will taste gritty. Always use powdered sweetener for the cream.
- Heavy hand with peppermint: Start small.
You can always add a drop; you can’t subtract “mouthwash.”
- Assembling while warm: Warm cakes melt the filling. Let them cool completely before sandwiching.
- Wrong cocoa: Cheap cocoa = flat, bitter flavor. Use Dutch-process for that deep, bakery-level chocolate vibe.
Different Ways to Make This
- Dairy-free: Use coconut oil or vegan butter in the cakes and a dairy-free cream cheese plus coconut cream in the filling.
Choose a sweetener that dissolves well, like powdered allulose.
- Mocha mint: Add 1 teaspoon instant espresso powder to the dry mix. Chocolate + coffee = flavor amplifier.
- Double chocolate: Stir in 1/3 cup sugar-free chocolate chips to the batter for pockets of melty goodness.
- Holiday sparkle: Tint the filling pale green or swirl green and white for a candy-cane effect. Crushed sugar-free peppermint on the edges for crunch.
- Vanilla-peppermint filling: Swap half the cocoa in the cakes with more almond flour for a lighter chocolate note and let the mint shine.
- Mini whoopies: Use a teaspoon scoop for bite-size party treats.
Bake 7–8 minutes.
FAQ
Can I use only almond flour and skip coconut flour?
Yes, but expect a slightly denser texture. If skipping coconut flour, add 2–3 extra tablespoons almond flour and watch the batter. You may need a touch less liquid.
What sweetener works best?
Allulose gives the softest texture and no cooling effect; erythritol blends can be slightly crisper.
For the filling, powdered is non-negotiable for smoothness.
How do I make them less sweet?
Reduce sweetener in the cakes by 2 tablespoons and in the filling by 2–3 tablespoons. Peppermint heightens perceived sweetness, so you won’t miss it.
Can I make the batter ahead?
Better to bake the cakes and store. Keto batters can thicken as they sit.
If you must hold it, refrigerate up to 1 hour and thin with a teaspoon of almond milk if needed.
My filling is runny—how do I fix it?
Chill it 10–15 minutes, then beat again. If still loose, add 1–2 tablespoons more powdered sweetener or a teaspoon of coconut flour to tighten.
Are these gluten-free?
Yes. Almond and coconut flours are naturally gluten-free.
Just ensure your baking powder and extracts are certified GF if you’re sensitive.
How many net carbs per whoopie pie?
Exact numbers vary by brand, but typically about 3–5g net carbs per assembled pie when using allulose or erythritol and the ingredient amounts listed. Always calculate with your specific products.
Final Thoughts
These keto peppermint chocolate whoopie pies deliver bakery-level indulgence without the sugar hangover. They’re plush, minty, and wildly satisfying—aka perfect for holidays, post-dinner flexes, or “just because” Tuesdays.
Keep a stash in the fridge, share if you’re generous, and enjoy a dessert that respects your goals and your taste buds. Cravings called. You just leveled up.

Printable Recipe Card
Want just the essential recipe details without scrolling through the article? Get our printable recipe card with just the ingredients and instructions.