
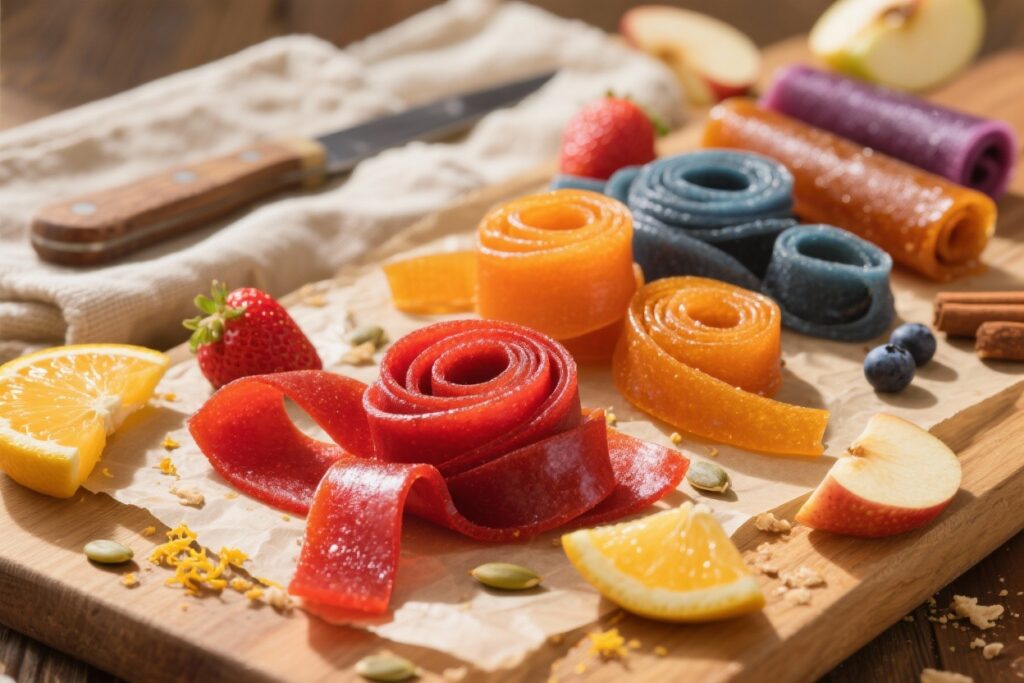
Snack rut? Let’s fix that with chewy, jewel-toned fruit leathers you can stash anywhere—kids’ lunches, hiking packs, or your desk drawer. These are bright, fruity, and naturally sweet without a grain of added sugar. Plus, homemade fruit leather is basically a set-it-and-forget-it project: blend fruit, spread it thin, and let the oven or dehydrator do its slow magic.
We’re talking pantry-friendly, freezer-friendly, and road-trip-ready. Each recipe below leans into pure fruit flavor (a little lemon, a little spice, maybe a swirl) for seriously snackable results. Ready to level up your snack game?
1. Sun-Kissed Strawberry Lemonade Roll-Ups
 You’ll Crave All Week")
Like a glass of lemonade in chewy form, these strawberry roll-ups are bright, tangy, and kid-approved. They’re the perfect starter recipe—simple, forgiving, and wildly delicious. Make a double batch because these vanish fast.
Ingredients:
- 4 cups ripe strawberries, hulled (fresh or thawed from frozen)
- 2 tablespoons freshly squeezed lemon juice
- 1 teaspoon finely grated lemon zest
- 1 teaspoon vanilla extract (optional, but lovely)
- Pinch of fine sea salt
Instructions:
- Preheat your oven to 170°F (or the lowest setting, up to 200°F). Line two rimmed baking sheets with silicone mats or parchment. If using parchment, lightly oil to prevent sticking.
- Blend strawberries, lemon juice, zest, vanilla, and salt until completely smooth. Taste—it should be bright and naturally sweet; adjust with a bit more lemon if needed.
- Pour the puree onto the prepared sheets and spread to an even 1/8 inch thickness with an offset spatula. Aim for uniform thickness so it dries evenly.
- Bake 3 to 5 hours, rotating pans halfway. It’s done when the surface is no longer tacky and peels easily from the mat, but still flexible.
- Cool fully, then peel off. Cut into strips and roll with parchment. Store airtight at room temperature for 1 week or refrigerate up to 1 month.
Pro tip: For extra zing, dust with a whisper of citric acid before rolling. Serve with yogurt or tuck into lunch boxes for a sweet-tart treat.
2. Tropical Sunrise Mango-Pineapple Leather
 You’ll Crave All Week")
Imagine a beach vacation in snack form. Mango and pineapple bring natural sweetness, while lime keeps everything punchy. This one’s sunshine-bright and perfect for post-workout fuel or afternoon slumps.
Ingredients:
- 3 cups ripe mango, chopped (from 3–4 mangoes or frozen, thawed)
- 2 cups pineapple chunks (fresh or thawed)
- 1 tablespoon fresh lime juice
- 1/2 teaspoon lime zest
- Pinch of sea salt
Instructions:
- Preheat oven to 170–200°F. Line two baking sheets with silicone mats or oiled parchment.
- Blend mango, pineapple, lime juice, zest, and salt until silky. If it’s super thick, add 1–2 tablespoons water to help it spread.
- Spread to 1/8 inch thickness on prepared sheets. Smooth the edges so they don’t over-dry.
- Dry 3 to 6 hours until set and pliable. Dehydrators work great here too: 135°F for 6–8 hours.
- Cool, peel, and slice into strips. Roll and store airtight.
Serving idea: Cut into small squares and fold into trail mix with roasted cashews and coconut flakes. Or layer strips with coconut yogurt for a quick parfait.
3. Summer Market Peach Cobbler Leather
 You’ll Crave All Week")
All the cozy peach cobbler vibes with zero added sugar. The secret? A touch of cinnamon and vanilla to amplify ripe peaches. It’s nostalgic, soft, and slightly spiced—basically dessert, minus the guilt.
Ingredients:
- 5 cups ripe peaches, peeled and chopped (about 6–8 peaches; frozen works too)
- 1 teaspoon ground cinnamon
- 1 teaspoon vanilla extract
- 1 tablespoon lemon juice
- Pinch of salt
Instructions:
- Preheat to 170–200°F. Line pans with silicone mats or oiled parchment.
- Blend peaches, cinnamon, vanilla, lemon juice, and salt until smooth. Taste. If your peaches are extra juicy, simmer the puree in a saucepan for 5–8 minutes to thicken—this speeds drying and deepens flavor.
- Spread evenly, about 1/8 inch thick. Tap the pans gently to level out bubbles.
- Dry 3 to 5 hours until the surface is set and leathery but bendy.
- Cool, peel, slice, and roll.
Variations: Add a pinch of nutmeg, or swirl in a couple tablespoons of unsweetened applesauce for extra silkiness. Serve with a handful of granola for “cobbler” energy.
4. Ruby Red Raspberry Chia Power Strips
 You’ll Crave All Week")
These are tangy, high-fiber, and surprisingly satisfying. Raspberries bring bold flavor; chia seeds give a nice chew and boost. Ideal for hikes, long drives, or “help, I need a snack now” moments.
Ingredients:
- 4 cups raspberries (fresh or thawed)
- 1 medium apple, peeled and chopped (for natural pectin and sweetness)
- 1 tablespoon lemon juice
- 2 tablespoons chia seeds
- Pinch of salt
Instructions:
- Preheat oven to 170–200°F. Prep baking sheets with silicone mats or oiled parchment.
- Blend raspberries, apple, lemon juice, and salt until very smooth. If you want fewer seeds, strain through a fine mesh sieve, then return to the blender.
- Stir in chia seeds and let the mixture rest 10 minutes to thicken.
- Spread to a uniform 1/8 inch thickness and dry 3 to 5 hours, rotating pans once. Watch edges—they finish first.
- Cool, peel, and slice into narrow “power strips.”
Pro tip: Dust the dried sheet with unsweetened shredded coconut before rolling so strips don’t stick together. Pair with dark chocolate squares for a sweet-tart snack moment.
5. Apple Pie Lunchbox Leather
 You’ll Crave All Week")
All the warm apple pie flavors, minus crust and sugar. Kids love this one, but adults hoard it too—no judgment. Cinnamon and a whisper of lemon keep it bright and cozy.
Ingredients:
- 5 cups unsweetened applesauce (or 6 cups peeled, chopped apples cooked down)
- 1 teaspoon ground cinnamon
- 1/2 teaspoon ground ginger
- 1 teaspoon lemon juice
- Pinch of sea salt
Instructions:
- Preheat oven to 170–200°F. Line baking sheets with silicone mats or oiled parchment.
- Stir together applesauce, cinnamon, ginger, lemon juice, and salt. If using cooked apples, blend until smooth.
- Optional flavor boost: Simmer the mixture for 10 minutes to concentrate the apple flavor and reduce water content.
- Spread to 1/8 inch thickness. Smooth the top with an offset spatula.
- Dry 3 to 6 hours until pliable and no longer sticky. Cool, peel, and cut into strips.
Serving ideas: Roll with a thin layer of peanut or almond butter for a PB-apple pie vibe. Or cut star shapes for festive lunchbox surprises.
6. Black Forest Cherry-Cocoa Swirls
 You’ll Crave All Week")
Decadent without being sugary, these cherry-cocoa swirls are a chocolate lover’s dream. The cocoa intensifies cherry flavor, while a swirl keeps it visually gorgeous. It’s the dessert-y fruit leather that feels a little fancy.
Ingredients:
- 4 cups dark sweet cherries, pitted (fresh or thawed)
- 2 tablespoons unsweetened cocoa powder
- 1 teaspoon vanilla extract
- 1 tablespoon lemon juice
- Pinch of salt
Instructions:
- Preheat to 170–200°F. Prepare pans with silicone mats or oiled parchment.
- Blend cherries, vanilla, lemon juice, and salt until smooth. Pour half the mixture into a bowl.
- To the remaining half in the blender, add cocoa powder and blend until fully incorporated.
- Pour alternating spoonfuls of cherry and cherry-cocoa onto the pan. Use a skewer to gently swirl—don’t overmix.
- Spread to 1/8 inch thickness, tidy the edges, and dry 4 to 6 hours until pliable.
- Cool, peel, and slice. Roll if you like, or keep as squares to show off the swirls.
Pro tip: Sprinkle with finely chopped toasted almonds before drying for crunch. Serve with Greek yogurt for a faux Black Forest parfait.
7. Spiced Pear Ginger Tea-Time Strips
 You’ll Crave All Week")
Elegant and subtly sweet, these pear-ginger strips feel like something you’d nibble with afternoon tea. Ginger brings warmth, and pear keeps it delicate. Ideal for cozy weather or gifting.
Ingredients:
- 5 cups ripe pears, peeled and chopped (Bosc or Anjou work well)
- 2 teaspoons freshly grated ginger (or 1/2 teaspoon ground)
- 1/2 teaspoon ground cardamom
- 1 tablespoon lemon juice
- Pinch of salt
Instructions:
- Preheat oven to 170–200°F. Line baking sheets with silicone mats or oiled parchment.
- Blend pears, ginger, cardamom, lemon juice, and salt. If pears are very juicy, simmer 5–8 minutes to thicken.
- Spread to a consistent 1/8 inch thickness.
- Dry 3 to 5 hours until firm but flexible. Cool, peel, and cut into thin strips.
- Roll and store airtight. These mellow and deepen in flavor after a day.
Serving ideas: Pair with sharp cheddar or aged Gouda (seriously, sweet + savory magic). Or drizzle a tiny bit of tahini on a strip for a sesame-pear moment.
Fruit Leather Basics: Your Quick-Start Guide
Here’s the cheat sheet so you nail it every time.
- Fruit Ratio: About 3–5 cups fruit makes one to two baking sheets. Aim for a pourable but thick puree.
- Thickness: Spread to 1/8 inch. Too thin = brittle, too thick = all-day drying.
- Liners Matter: Silicone mats are best. If using parchment, lightly oil. Foil is a no—sticks forever.
- Oven Temp: As low as your oven goes (170–200°F). Dehydrator at 130–140°F works beautifully.
- Doneness: Not tacky, peels cleanly, bends without cracking.
- Storage: Cool fully, roll in parchment, store airtight. Room temp 1 week; fridge 1 month; freezer 6 months.
- Sweetness Boosts (No Sugar): Use super-ripe fruit, reduce puree on the stove, blend with dates if needed (1–2 Medjool per batch), or add a squeeze of citrus to brighten perceived sweetness.
Troubleshooting Like a Pro
- Edges Over-Dry, Center Sticky: Spread more evenly next time; tent edges with foil in the last hour; rotate pans halfway.
- Leather Cracks: Too thin or over-dried. Rehydrate by brushing lightly with warm water, then rest covered for 10 minutes.
- Sticks to Parchment: It needed more time or more oil. Return to oven 20–30 minutes, cool again, then peel.
- Flavor Falls Flat: Add lemon or lime juice, a pinch of salt, or warm spices. Concentrate puree by simmering 5–10 minutes first.
Fun Swirls, Layers, and Shapes
- Two-Tone Sheets: Spread one fruit, then dollop a second flavor and swirl lightly with a skewer.
- Layered Bars: Dry one thin layer halfway, spread a second thin layer, and finish drying for defined stripes.
- Cut-Outs: Use cookie cutters on cooled sheets—stars, hearts, dinosaurs—for party platters or kids’ snacks.
Dehydrator vs. Oven
- Dehydrator: Most even results, hands-off, 6–10 hours at 135°F.
- Oven: Totally fine. Keep door cracked with a wooden spoon if your oven runs hot to let moisture escape.
Food Safety and Storage
- Use clean equipment and wash fruit well.
- Cool leather completely before rolling to prevent trapped condensation.
- For long-term storage, wrap in parchment, then a zip-top bag. Freeze for up to 6 months.
There you go—seven no-sugar-added recipes that turn ripe fruit into chewy, packable magic. Pick a flavor to start, blend it up, and let your kitchen smell like a summer orchard. Trust me, once you taste homemade fruit leather, the store-bought stuff won’t stand a chance. Happy snacking!
Printable Recipe Card
Want just the essential recipe details without scrolling through the article? Get our printable recipe card with just the ingredients and instructions.